When students flash their ID cards, what message does it send? Is it merely a credential, or does it reflect the pride and professionalism of your institution? Designing Custom Student ID Cards: Templates & Personalization isn't just about sticking a photo on a piece of plastic; it's about crafting a miniature brand ambassador that enhances security, fosters community, and streamlines daily operations. A well-designed student ID card is a powerful tool, yet many schools inadvertently miss the opportunity to maximize its potential.
This guide is for school administrators, program coordinators, and anyone tasked with creating identification that's not only functional but also memorable, secure, and genuinely representative of their educational environment. We'll cut through the jargon and show you how to leverage readily available tools and smart design choices to produce student ID cards that truly stand out—and perform.
At a Glance: Key Takeaways for Student ID Design
- Beyond Basic ID: Understand that a custom student ID serves multiple purposes: identification, security, access control, and brand reinforcement.
- Templates Are Your Friend: Start with professional, customizable templates from platforms like Canva or Kapwing to save time and ensure a polished look.
- Personalization is Key: Tailor each card with individual student data (photos, names, ID numbers) and school-specific branding (logos, colors, mottos).
- Prioritize Clarity: Ensure essential information is immediately legible, using clear fonts and logical layouts.
- Integrate Security: Incorporate visual and technological security features to prevent counterfeiting and enhance safety.
- Choose Wisely: Select card materials and printing methods that match your budget, durability needs, and aesthetic goals.
- Data Matters: Manage student data responsibly and securely throughout the design and printing process.
More Than Just a Photo: The Multi-Faceted Role of Custom Student IDs
In an increasingly complex world, a student ID card is far more than just proof of enrollment. It's a passport within the school ecosystem, unlocking access to libraries, dormitories, dining halls, and even events. For your students, it's a tangible symbol of belonging, fostering a sense of community and school spirit. For staff, it's a vital security tool, helping to quickly identify authorized individuals and control access to restricted areas.
Customizing these cards allows your institution to weave its unique identity directly into this essential item. Think of it as a small billboard, reinforcing your school's brand every time it’s used. This consistency strengthens your image, cultivates loyalty, and sets a professional tone from day one. Generic, hastily produced cards, on the other hand, can undermine security efforts and diminish the perceived value of your institution. By taking the time to design thoughtful, custom IDs, you're investing in your school's safety, efficiency, and overall presence.
The Anatomy of an Effective Student ID Card: Essential Elements
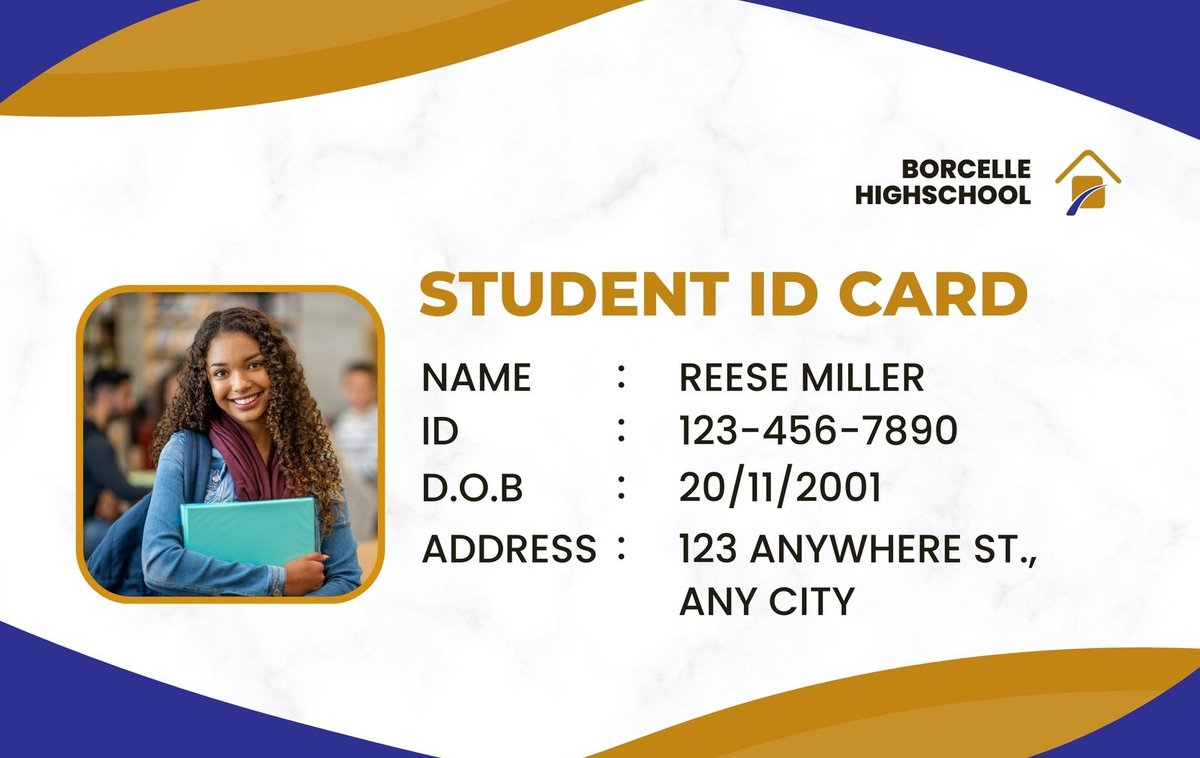
Before diving into design, let's break down what must appear on nearly every student ID card. These aren't just suggestions; they're the core components that make the card functional, secure, and legally compliant.
- Student Photograph: A clear, recent headshot is paramount for visual identification. It should be high-resolution, front-facing, with a neutral background, and taken in good lighting.
- Full Legal Name: The student's first and last name should be clearly displayed. Middle initials can be included if space allows and if consistency is required.
- Student ID Number: A unique identifier for each student, crucial for administrative tracking, library systems, and access control.
- Institution Name & Logo: Prominently feature your school, college, or university's official name and logo. This immediately establishes authenticity and reinforces brand identity.
- Card Expiration Date: Essential for managing validity, especially for students graduating or transferring. This helps prevent outdated cards from being used.
- Barcodes or QR Codes (Optional but Recommended): These allow for quick scanning for attendance, library checkouts, point-of-sale systems, or even building access. They streamline many daily school operations.
- Grade Level or Program (Optional): Useful for large institutions, differentiating high school students from middle schoolers, or indicating specific academic programs.
- Contact Information/Emergency Number (Optional): A small, easily readable emergency contact number or a school security line can be invaluable in critical situations.
- Magnetic Stripe or RFID Chip (Advanced Security): For schools requiring advanced access control, payment systems, or multi-functional use, these embedded technologies are key.
Each element plays a specific role, contributing to the card's overall utility and security. Thoughtful placement and clear presentation of these details are crucial for a card that truly works.
Your Design Launchpad: Leveraging Student ID Card Templates
Let's face it: not everyone is a graphic designer. And that’s perfectly fine! The good news is you don't need to be an Adobe expert to create stunning student ID cards. The secret weapon? High-quality, customizable templates. These pre-designed layouts provide a professional foundation, saving you countless hours and ensuring a polished result from the start.
Online platforms like Canva and Kapwing have revolutionized access to design tools, offering extensive libraries of student ID card generator templates specifically tailored for educational institutions.
- Canva: Known for its user-friendly interface, Canva provides a vast selection of student ID card templates that are easy to adapt. You can quickly change colors, fonts, upload your school logo, and drag-and-drop student photos. The platform offers a seamless experience from design to print, even providing professional printing services directly.
- Kapwing: This platform also offers free, customizable student ID card templates. Kapwing emphasizes ease of use, allowing administrators, teachers, or student organization leaders to create authentic-looking identification cards in minutes, without any prior design experience. Their templates feature modern layouts with clear spaces for all essential information.
Why Templates are a Game-Changer:
- Professional Foundation: Templates ensure a clean, balanced, and aesthetically pleasing layout, even if you have no design background.
- Time-Saving: Skip the blank canvas intimidation. Templates provide a starting point, allowing you to focus on personalization rather than structural design.
- Consistency: Using a single template across all student IDs ensures visual uniformity, reinforcing your school's brand and professionalism.
- Cost-Effective: Many template libraries offer free options, and even premium templates are significantly more affordable than hiring a professional designer for every card.
- Easy Customization: Modern template tools are incredibly intuitive, allowing you to quickly modify elements to match your specific needs and branding.
When selecting a template, look for one that aligns with your school's overall aesthetic and clearly accommodates all the essential elements we discussed. Remember, a template is just the beginning—the real magic happens with personalization.
Bringing Your Brand to Life: Customization Essentials
Templates give you the structure, but customization is where your student ID cards truly become yours. This is about infusing your school's unique identity into every card, making it instantly recognizable and a source of pride.
Colors and Typography: Speaking Your School’s Language
Your school likely has official colors and fonts, and your ID card is a prime place to feature them.
- Color Palette: Use your institution's primary and secondary colors. These hues evoke specific emotions and create instant brand recognition. Ensure contrast for readability, especially for text.
- Font Choices: Stick to your school's official fonts if possible. If not, choose clear, legible fonts that reflect your school's personality. Sans-serif fonts (like Arial, Helvetica, or Open Sans) are generally best for small text on ID cards due to their readability. Avoid overly decorative or thin fonts that are difficult to scan quickly. Limit yourself to one or two complementary fonts for consistency.
Logo and Mascot: Visual Identity at its Core
Your school logo and, if applicable, mascot are the cornerstones of your visual identity.
- High-Resolution Logo: Always use a high-resolution version of your school logo. A pixelated logo instantly makes the card look unprofessional and can undermine trust. Place it prominently, perhaps at the top or bottom, ensuring it doesn't obstruct critical information.
- Mascot Inclusion: If your school has a mascot, consider tastefully integrating it. This can add a touch of personality and school spirit, particularly for younger students. Ensure it complements, rather than overwhelms, the design.
Emblems, Mottos, and Graphics: Subtle Enhancements
Beyond the basics, you can subtly enhance your custom student ID cards with additional design elements:
- School Motto/Slogan: A small, legible motto can be placed on the back or in a less prominent area on the front.
- Pattern or Texture: A subtle background pattern or texture, perhaps incorporating a watermark of your logo, can add sophistication and an extra layer of security, making counterfeiting more difficult.
- Visual Hierarchy: Use size, color, and placement to guide the eye. The student's photo and name should be the most prominent, followed by the school logo and ID number. Information should flow logically.
Remember, the goal is to create a card that is clearly branded and reflective of your institution, without becoming cluttered or difficult to read. Less is often more when it comes to effective ID card design.
The Art of Personalization: Making Each Card Truly Unique
While branding gives your student ID cards their institutional identity, personalization makes each card unique to the individual student. This is the crucial step that transforms a generic card into a functional identification tool.
Capturing Student Photos: Best Practices
A good photo is arguably the most important element for quick visual identification.
- Consistent Background: Use a plain, light-colored background (white or light blue are common) for all student photos. This ensures uniformity and prevents distractions.
- Good Lighting: Natural, even lighting is ideal. Avoid harsh shadows or overexposure.
- Front-Facing and Centered: Students should face the camera directly, with their head and shoulders centered in the frame.
- Neutral Expression: A natural, neutral expression is best. Avoid excessive smiles or props.
- No Hats or Sunglasses: Unless for religious reasons, hats and sunglasses should be removed to ensure clear facial recognition.
- Resolution and File Size: Use high-resolution images (at least 300 dpi) to ensure clarity when printed, but optimize file sizes for efficient upload and storage.
Collecting these photos systematically is key. Many schools use dedicated photo days or allow students to submit approved digital photos through an online portal.
Dynamic Data Integration: Names, Numbers, and More
Integrating unique data for each student is where the design process meets database management. This typically involves:
- Student Names: Ensure accurate spelling and consistent formatting (e.g., First Name Last Name).
- Student ID Numbers: Double-check these for accuracy, as they are often linked to various school systems.
- Grade Levels/Program Affiliations: If included, ensure these are correct for the current academic year.
- Barcode/QR Code Data: The data encoded in these elements must correspond to the correct student ID number or a unique identifier that links back to your student information system.
Many student ID card generator software solutions allow for batch processing, where you upload a spreadsheet of student data (names, ID numbers, photo filenames) and the software automatically populates each card template. This dramatically speeds up production and minimizes manual data entry errors. Always proofread a sample batch before mass printing to catch any formatting or data inconsistencies.
Designing for Clarity and Impact: Best Practices
A beautiful ID card is useless if it's hard to read or doesn't convey information effectively. Good design isn't just about aesthetics; it's about functionality.
- Readability First: This is non-negotiable. Information on an ID card needs to be scannable at a glance.
- Font Size: Ensure key information (name, ID number) is large enough to be read from a short distance.
- Contrast: High contrast between text and background is crucial. Dark text on a light background is generally best. Avoid busy background images that compete with text.
- Whitespace: Don't cram too much information. Ample whitespace makes the card less intimidating and easier to process visually.
- Visual Hierarchy: Guide the eye to the most important information.
- The student's photo and name should be the most prominent elements.
- The school logo and ID number should come next in prominence.
- Less critical information (expiration date, small print) can be smaller or placed on the back.
- Consistency is Key: Once you've established your design guidelines (fonts, colors, layout), stick to them for every card produced. This creates a cohesive, professional look across the entire student body.
- Front and Back Utilization: Don't forget the back of the card! This space can be used for:
- Emergency contact numbers
- School policy reminders (e.g., "Card must be carried at all times")
- Lost and found instructions
- Library barcode (if not on the front)
- Important dates or bell schedules (if space allows)
By adhering to these principles, your student ID cards will not only look great but also perform their critical functions seamlessly and efficiently.
Fortifying Security: Layers of Protection for Your IDs
In an era where security is paramount, student ID cards are a first line of defense. Designing them with robust security features helps prevent counterfeiting, unauthorized access, and maintains the integrity of your identification system.
Visual Security Features: Deterring Counterfeiters
These are elements that are visible to the naked eye and make cards harder to replicate:
- Holograms/Overlays: A holographic overlay or custom hologram embedded in the card is extremely difficult and expensive to reproduce accurately. It adds a sophisticated layer of visual security.
- Fine-Line Printing/Microtext: Extremely small text or intricate patterns that are difficult to see without magnification, and impossible for standard printers to replicate.
- UV Printing: Invisible ink that becomes visible only under UV light, often used for additional security information like a small logo or student ID number.
- Guilloche Patterns: Complex, interwoven patterns that are characteristic of currency and official documents, virtually impossible to copy perfectly.
- Ghost Images/Duplicate Photos: A smaller, less prominent version of the student's photo placed elsewhere on the card, providing a secondary visual check.
Embedded Technologies: Beyond the Visual
For schools requiring advanced functionality and enhanced security, embedded technologies are essential:
- Barcodes (1D/2D): As mentioned, these are easy to implement and scan for basic tracking and access. 1D barcodes are common, while 2D barcodes (QR codes) can store more data.
- Magnetic Stripes: Often found on the back of the card, these can encode data for door access, cafeteria payments, or library checkouts. They require a magnetic stripe reader.
- RFID (Radio-Frequency Identification) Chips: These chips, either contact (smart cards) or contactless (prox cards), enable sophisticated access control, cashless payments, and attendance tracking simply by tapping or waving the card near a reader. They offer higher security and greater convenience but come with a higher cost.
- NFC (Near Field Communication): A subset of RFID, NFC allows for short-range wireless communication, often used in mobile payment systems and increasingly in multi-functional ID cards.
When considering security features, weigh the cost against the level of risk your institution faces. For most schools, a combination of visual features (holograms, microtext) and basic embedded tech (barcodes) provides an excellent balance of security and affordability. For larger universities with extensive facilities, RFID or smart card technology might be a more fitting investment.
Material Matters: Choosing the Right Card Stock and Printing Method
The best design in the world won't last if it's printed on the wrong material or using an inadequate method. Your choice of card material and printing technology impacts durability, appearance, and cost.
Card Materials: Durability vs. Budget
- PVC (Polyvinyl Chloride): This is the industry standard for ID cards. PVC cards are durable, flexible, and provide an excellent surface for printing vibrant colors. They are resistant to bending and general wear and tear, making them a good all-around choice for student IDs. They come in various thicknesses, with CR80 (credit card size) being the most common.
- Composite Cards (PVC/Polyester Blend): Even more durable than pure PVC, these cards are ideal for environments where cards see heavy daily use or are exposed to harsh conditions. They offer enhanced resistance to warping and breaking, often used for cards that will be laminated or have embedded electronics.
- Teslin (Synthetic Paper): This material is less common for dedicated ID cards but is sometimes used for temporary or multi-purpose cards. It's a synthetic paper that can be printed on with standard inkjet or laser printers, then laminated to create a durable, waterproof card. It's often more cost-effective for smaller batches or in-house printing.
- Recycled Materials: As sustainability becomes a greater concern, some manufacturers offer ID cards made from recycled PVC or other eco-friendly plastics.
Printing Methods: In-House vs. Professional
- In-House ID Card Printers (Dye-Sublimation/Thermal Transfer):
- Pros: Immediate production, complete control over the printing process, ideal for small batches, reissuing lost cards, or printing personalized data on pre-printed card stock. Many include lamination modules for added durability.
- Cons: Higher upfront cost for the printer, ongoing cost of ribbons and blank cards, requires some technical knowledge to operate and maintain. Best for medium to large institutions that need continuous card production.
- Professional Printing Services:
- Pros: High-quality, professional finish (offset printing), often more cost-effective for very large initial batches (e.g., an entire school enrollment), can include advanced security features (holograms, microtext) that in-house printers can't replicate. No equipment or maintenance hassle.
- Cons: Longer lead times, less flexibility for on-demand printing of single cards, less control over the immediate process.
- Hybrid Approach: Many schools opt for a hybrid model: using a professional service for the initial bulk print of branded cards (with common design elements) and then using an in-house printer to personalize each card with student-specific data and photos.
When making your decision, consider your budget, the number of cards you need to print annually, the required level of security, and how quickly you need to produce or replace cards.
Avoiding Common ID Card Design Blunders
Even with templates and powerful tools, it's easy to make mistakes that undermine the effectiveness and security of your student ID cards. Here are some pitfalls to steer clear of:
- Cluttered Design: Trying to fit too much information on one card makes it difficult to read and visually overwhelming. Prioritize essential data and use the back of the card for secondary information.
- Poor Readability:
- Low Contrast: Light text on a light background (or vice versa) is a common offender.
- Tiny Fonts: Don't shrink text to squeeze it in. If it can't be read easily, it's useless.
- Fancy Fonts: While visually appealing, ornate fonts are often illegible at small sizes. Stick to clean, professional typefaces.
- Pixelated Logos/Images: Using low-resolution images for your school logo or student photos makes the card look unprofessional and cheap. Always use high-quality source files.
- Inconsistent Branding: Variations in logo usage, color shades, or font styles across different batches of cards dilute your brand and can raise security questions. Establish clear brand guidelines and stick to them.
- Insufficient Security Features: Relying solely on a photo and name is a weak security posture. Incorporate at least one or two visual security features to deter counterfeiting.
- Forgetting Expiration Dates: Cards without clear expiration dates can remain in circulation long after a student has left the institution, posing a security risk.
- Ignoring Data Privacy: Not having a secure system for collecting, storing, and printing student data can lead to serious privacy breaches.
- Lack of Testing: Don't print hundreds of cards without first testing a sample. Check readability, scan barcodes/RFID, and confirm all data is accurate.
By being mindful of these common mistakes, you can ensure your student ID card design is robust, functional, and secure.
Your Step-by-Step Guide to Creating a Custom Student ID
Ready to put theory into practice? Here's a simplified, actionable roadmap to designing and producing your custom student ID cards:
- Define Your Needs:
- What information must be on the card? (Essential elements list)
- What security features are necessary? (Barcodes, holograms, RFID)
- What's your budget for materials and printing?
- How many cards do you need, and how frequently?
- What functionality does the card require (access, payments, library)?
- Gather Your Assets:
- High-resolution school logo and any official mascots.
- Official school colors (CMYK or HEX codes).
- Official school fonts.
- Student data: names, ID numbers, grade levels (in a spreadsheet format).
- Student photos: high-resolution, consistent format, named clearly (e.g., by student ID number).
- Choose Your Design Platform & Template:
- Select an online design tool (Canva, Kapwing) or dedicated ID card software.
- Browse templates and choose one that best fits your school's aesthetic and required layout.
- Customize the Template with Your Branding:
- Upload your school logo.
- Adjust colors to match your official palette.
- Select appropriate fonts for readability and brand consistency.
- Add any secondary branding elements (motto, watermark).
- Integrate Security Features:
- Add a designated space for a barcode or QR code.
- If using professional printing, discuss hologram or UV printing options.
- Plan for magnetic stripes or RFID chips if required for advanced functionality.
- Personalize with Student Data:
- Use your chosen platform's data merge function to import student names, ID numbers, and photos from your spreadsheet.
- Carefully map the data fields from your spreadsheet to the corresponding fields on the ID card template.
- Review and Proofread Thoroughly:
- Print a few sample cards.
- Check every single data point for accuracy: names, ID numbers, photos.
- Verify the clarity of text, contrast, and overall layout.
- Test any barcodes or embedded tech to ensure they scan and function correctly.
- Choose Your Printing Method:
- Decide between in-house printing, professional printing, or a hybrid approach based on your needs and budget.
- Order blank card stock if printing in-house.
- Print and Distribute:
- Proceed with full-scale printing.
- Implement a secure distribution process to ensure each student receives their correct card.
By following these steps, you’ll move from concept to a stack of professional, personalized student ID cards with confidence.
Data Integrity and Privacy: A Critical Consideration
When dealing with student identification, responsible data handling is not just good practice—it's often a legal requirement. Protecting student privacy is paramount.
- Secure Data Collection: Ensure that the process for collecting student photos and personal information is secure and compliant with relevant privacy regulations (e.g., FERPA in the US, GDPR in Europe, or local equivalents).
- Limited Access: Restrict access to student data to only authorized personnel who need it for ID card production.
- Secure Storage: Store student data and photos on secure servers or encrypted drives. Delete data securely once the cards have been produced and verified, or retain it according to your school's data retention policy.
- Third-Party Vendors: If you use a professional printing service or an online design platform, ensure they have robust data security and privacy policies in place. A Non-Disclosure Agreement (NDA) or Data Processing Addendum (DPA) might be necessary.
- Data Accuracy: Implement checks and balances to ensure the data printed on cards is accurate. Errors can lead to administrative headaches and security vulnerabilities.
A strong commitment to data privacy builds trust with students and parents and protects your institution from potential liabilities.
Beyond Today: The Evolving Role of Student IDs
The student ID card isn't static; its role continues to evolve with technology and institutional needs.
- Digital IDs: Many schools are exploring or implementing digital ID cards accessible via a smartphone app. These can offer enhanced security features (e.g., animated elements), real-time updates, and easier reissuance. Physical cards may still be necessary as a backup or for specific use cases, but digital options are gaining traction.
- Multi-Functional Cards: The trend is towards a single card that does more. Beyond identification and access, cards can integrate with:
- Cashless payment systems (for cafeteria, vending machines, bookstore)
- Public transportation passes
- Attendance tracking for classes and events
- Voting for student elections
- Laundry services in dorms
- Sustainability: As environmental concerns grow, expect to see more demand for ID cards made from recycled or biodegradable materials.
Staying aware of these trends allows your institution to plan for future upgrades and ensure your ID card system remains efficient and relevant.
Your Next Step: Designing with Confidence
Designing custom student ID cards doesn't have to be a daunting task. By leveraging professional templates, thoughtfully personalizing each card, and integrating smart security features, you can create a system that enhances campus safety, strengthens your school's brand, and provides invaluable utility to your students and staff.
Take this guide as your blueprint. Start by defining your needs, gather your assets, and then dive into the world of customizable templates. Remember to prioritize clarity, secure your data, and always proofread. The result will be not just an identification card, but a powerful emblem of your institution, proudly carried by every student.